Charting Guide
Table of Contents
- Syncing Audio
- Starting with KSM Editor
- Creating a Chart
- Illegal patterns and charting practices
- References
Syncing Audio
Before starting to chart, we have to sync the audio for the chart. This guide will be using Audacity but feel free to use whatever audio editor you want.
Open your song in Audacity and create a new track. Go to the top -> Generate -> Rhythm Track. In the Tempo (bpm), change it to the song BPM. If you don’t know, use a tap the bpm website and figure out.
Then, create space in the track and head to the top - Generate - Silence. Generate around 15-30 seconds of silence. Move the song and the silence next to each other.
Now, you need to line up the 2nd measure to the first downbeat of the song. The 2nd measure is the 2nd big tick in BPM track. You can zoom in holding Alt to get really close line it up perfectly. If you find that the 2nd measure is not enough, you can use the 3rd measure as well. The video below uses
Then, delete the silence in the beginning so the rhythm track is at the start. After it is lined up with your song, you can now delete the rhythm track and export as a WAV or OGG. Also, export as 44100Hz or else chart effects will be messed up. Do not use MP4
If done correctly, you should now have a measure of silence into the start of your song. It should be timed perfectly so no need to mess with offset.
Starting with KSM Editor
Upon opening the KSM editor, there are some settings you will most likely want to change. Firstly, if your editor is in gibberish (random symbols), you have to set your language options in KSM to English. You can do this by opening KSM and heading to Options -> Display/Sound settings -> Language.
Under the View menu in the editor, you can change how the editor looks. You can play around with these, but at the minimum is it recommended to have Increase spacing between lanes as it makes it easier to use lasers.
Creating a Chart
Now its time to setup creating the chart. First, press File -> Save and when asked about song title, just click yes. Save your chart into a folder. In this folder, make sure to put the song file and jacket file you want to use. If you want to use different effects, you would also place the effects in this folder.
 Example Folder Setup
Metadata
Head to Edit -> Chart metadata - General. In here, you can change the Metadata of your chart
Song Title: Title of the SongArtist: Artist of the SongEffected by:Who made the chartJacket illust filepath: Path to the photo of the jacket. If it’s in your folder, you can just put the file name, no need to put the path.Illustrated by: Who illustrated the jacketDifficulty: Difficulty category of the chart. Light = NOV, Challenge = ADV, Extended = EXH, Infinite = MXMLevel [1-20]: What level of difficulty your chart isBPM: Initial BPM of the songSong filename: Filename of your song, must include .ogg or .wav extension and song must be in the same folder as the chartSong volume: How loud the song isOffset[ms]: Milisecond offset that gets added to the chart. Negative shifts song later, positive shift song earlierSample start[ms]: Where the sample (the song that plays when you hover over the chart) starts in milisecondsSample length[ms]: How long the sample last till it loops again in milisecondsBackground: Background of your chartForeground layer: The images on the side of the lane that passes by
It is important to note that you don’t need to fill out everything here for the chart to work. The only essiential ones are BPM and Song filename.
There is also more metadata options in Edit -> Chart metadata - Detail
Comments: A comment that shows up in song select on KSMStandard BPM of HiSpeed: Set the baseline BPM where hispeed changes from if there are BPM changesReduce volume for narrow Laser slams: Since slam sound effects can overlap, you can use this to reduce the volumePeaking filter delay: Sets how long the delay is on PEAK filter for lasersTotal: Sets the total amount of HP in your chartGenre icon filename: Path to the genre icon. Mostly used for if you are making a folder pack and have a icon for all the charts in that folder
Most of these settings you will not have to mess with and are fine on default.
Using the Editor
First, press space to play your chart. Make sure the song plays. If there is no song, check if the chart and the song are in the same folder, and the filename is correct in the metadata.
 Modes
ModesThere are 3 modes in the editor that you can be in. These are
- Select
P: Highlight and select objects. HoldingCTRLallows you to select multiple objects - Edit
N: Allows to place objects with left click and remove objects with right click - Delete
E: Delete objects with left click
You can press the hotkeys to swap between these or just click them
 Selections
These are the selections for objects that you can place or manipulate.
- BPM
O: Set BPM. Also sets the starting point when using test play or previewing. - BT-Chip
H: Manipulates BT-Chips - BT-Long
J: Manipulates BT-Longs - FX-Chip
K: Manipulates FX-Chips. HoldingCTRLand clicking will put a SFX on it - FX-Long
L: Manipulates FX-Longs. HoldingCTRLand clicking will add a filter to it. HoldingShiftwill allow you to change the parameters for it - Laser-L
Q: Manipulates The left (blue) laser - Laser-R
W: Manipulates the right (red) laser
Pressing the down arrow will reveal more options
- Laser sounds/gain type
G: Set laser volume. HoldingCTRLwill change the filter - Laser slam sounds volume/sample
V: Set slam volume. HoldingCTRLwill change the filter - Lane spin effect
S: Adds spin effect. HoldingCTRLchanges spin type. HoldingCTRLand pressing arrow keys will change how fast or slow the spin is - Lane tilt effect type
R: Sets the tilt for the chart. PressingCTRLlets you set custom values - Lane zoom (Top)
Z: Sets the zoom/camera for the top of the lane. Higher value is closer, lower value is farther. Can go negative - Lane zoom (Bottom)
X: Sets the zoom/camera for the bottom of the lane. Higher value is closer, lower value is farther. Can go negative - Horizontal lane movement
C: Moves the lane left or right. Positive moves right, negative moves left. - Pause
F: Sets a scroll speed stop. Same as stops in Spatiotemporal ShockWAVE Syndrome…?
Pressing the middle mouse button will allow you to select where the preview starts. Holding the middle mouse button and moving your mouse will allow you to select a portion of the chart.
Selected objects can be moved with arrow keys, Mirrored with CTRL + R, and randomized CTRL + Shift + R. You can press the edit dropdown and select Reverse selected notes or Randomize selected notes
If you want to add custom SFX to a FX-Note, you can put the FX-Note sound effect in the folder with the chart and it will show up for you to use in the dropdown. Here is a link to general common SFX that are used for FX. You can just extract inside your chart folder if you want.
Lasers
Using the laser selection, left clicking anywhere will create a laser slam from the direction the laser normally comes from. You can adjust the head of the laser by holding CTRL and pressing the arrow keys. Holding Shift and pressing the arrow keys will adjust the starting position of the laser
Holding left click and dragging will allow you to create a long laser from the direction the laser normally comes from. Holding CTRL will allow you to start a laser from anywhere.
You can give a laser extended range by holding CTRL and Shift while placing the laser. You can also make a laser have extended range by holding CTRL and Shift then left clicking on a laser
Curve Generator
There is a curve generator that you can use to easily make curves. While it is mostly in japanese, it is pretty easy to use once you understand it.
First, head to the curve generator website
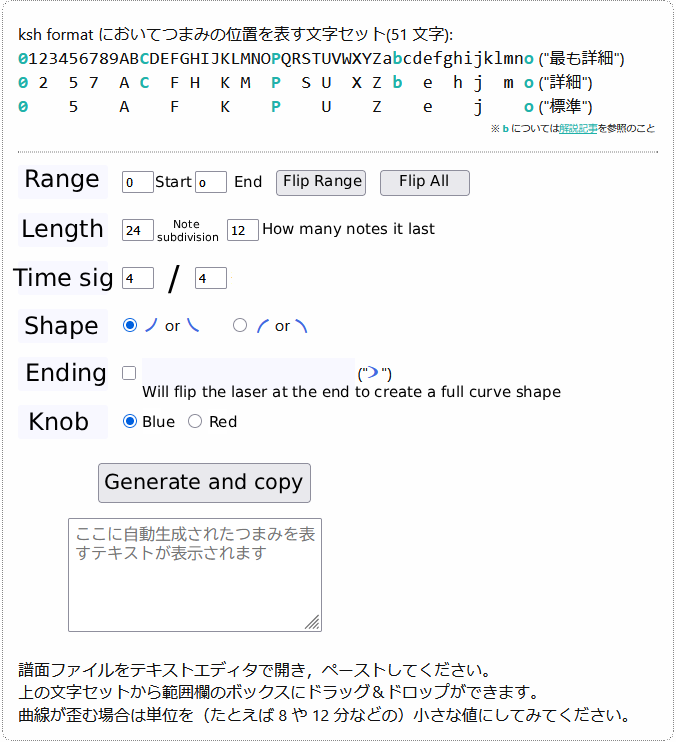
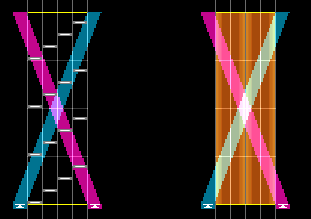
Above is a translation of how this works. If you don’t understand how lasers work in KSM, I would recommend reading a little bit here before continuing.
At the top you can see the laser range. The first section, or range, is the range/how far left and right the laser goes. For example, in this image, the laser will start at 0, or the far left and go to o or the far right. If I would want it to end in the middle, I would change the o to something around P.
Length is the subdivision of the notes and how many notes it will last. In this image, the 24 represents that the laser is on a 24th note. The next number, 12, says how many notes the laser will last. So, in this example, the laser would last half the measure, since its 12 notes of the 24th.
Time sig is the time signature of the laser.
Shape is the shape of the laser.
Ending is if you want the curve to end/fully curve, you can check this box to create the full shape (as shown in the icon).
Knob decides which knob to use.
Once you have your settings setup, press Generate and Copy.
Head to your chart and make a comment where you would like to put this laser. Using the edit tool with the BPM selection, holding Shift and CTRL and clicking on where you want the laser will open the comment window. Write a comment that you will remember. This will be your “mark” in the KSH file.
 What the comment will look like in KSH editor
Now, open your .ksh chart in a text editor. It should look something like this
title=sdvx.org
artist=mason
effect=mason
jacket=.jpg
illustrator=mason
difficulty=extended
level=1
t=100
m=joyeuse.wav
mvol=75
o=0
bg=desert
layer=arrow
po=0
plength=10
pfiltergain=50
filtertype=peak
chokkakuautovol=0
chokkakuvol=50
ver=171
--
beat=4/4
0000|00|--
--
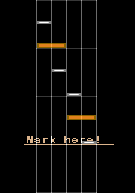
...You can ignore most of this and press CTRL + F or whatever hotkey your find is and search for your comment.
--
//Mark here!
0001|00|--
0000|02|--
0010|00|--
0100|00|--
0000|20|--
1000|00|--
0001|00|--
0000|02|--
--
Heres what mine looks like. Now, copy and paste what you got from the website into here. This will replace this whole measure with this laser. Note that anything else you placed in these measures will be replaced.
Camera
In KSM you can adjust the Top or Bottom of the camera. The top moves the camera around the edge of the circle. Positive moves clockwise while negative moves counter clockwise. Bottom changes the size of the circle, or the radius. A negative value increases the radius while portative decreases the radius. Here is a photo demonstration and videos of how this works.
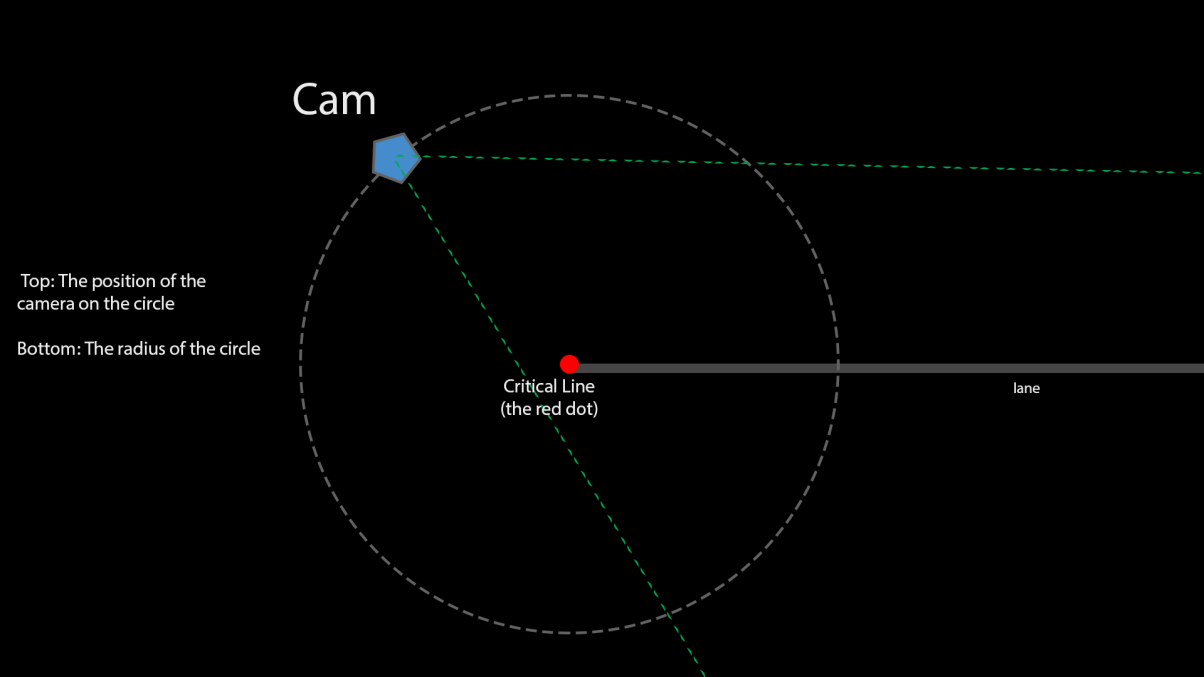 From Ted's guide
Top camera going from -100:100
Bottom camera going from -100:100
While I use the range -100:100 in the video, you can use numbers much bigger then that if you need.
Tilt
There is also tilt. Upon just left clicking you will have 7 options. The KEEP options just hold the current position of the tilt, so the tilt isn’t effected by new lasers.
 Normal tilt
 Bigger tilt
 Biggest tilt
Upon holding CTRL and left clicking, you can add a custom value to the tilt. This works similar to the camera.
For what the values of manual tilt mean:
- Normal tilt = 100
- Bigger tilt = 175
- Biggest tilt = 250
Bonus effects
Lane split
You can create a lane split effect similar to 666 . Using the edit tool with the BPM selection, holding Shift and CTRL and clicking on where you want the lane split will open the comment window. Write a comment that you will remember. This will be your “mark” in the KSH file.
What the comment will look like in KSH editorNow, open your .ksh chart in a text editor. It should look something like this
title=sdvx.org
artist=mason
effect=mason
jacket=.jpg
illustrator=mason
difficulty=extended
level=1
t=100
m=joyeuse.wav
mvol=75
o=0
bg=desert
layer=arrow
po=0
plength=10
pfiltergain=50
filtertype=peak
chokkakuautovol=0
chokkakuvol=50
ver=171
--
beat=4/4
0000|00|--
--
...
You can ignore most of this and press CTRL + F or whatever hotkey your find is and search for your comment.
--
//Mark here!
0001|00|--
0000|02|--
0010|00|--
0100|00|--
0000|20|--
1000|00|--
0001|00|--
0000|02|--
--
Heres what mine looks like. Under the comment, place center_split=(value) replacing (value) with whatever number you want. The bigger the number the bigger the lane split. So, for example, if I wanted a 50 lane split it would look like
--
//Mark here!
center_split=50
0001|00|--
0000|02|--
0010|00|--
0100|00|--
0000|20|--
1000|00|--
0001|00|--
0000|02|--
--
This will not show up in the editor, but will be there when you test play. Your comment will mark where it is in the editor, but you can also remove the comment line if you like.
Invisible Lane (USC ONLY)
You can add a invisible lane similar to Lachryma . This is a USC only effect and will not show in KSM. Using the edit tool with the BPM selection, holding Shift and CTRL and clicking on where you want the invisible lane will open the comment window. Write a comment that you will remember. This will be your “mark” in the KSH file.
What the comment will look like in KSH editorNow, open your .ksh chart in a text editor. It should look something like this
title=sdvx.org
artist=mason
effect=mason
jacket=.jpg
illustrator=mason
difficulty=extended
level=1
t=100
m=joyeuse.wav
mvol=75
o=0
bg=desert
layer=arrow
po=0
plength=10
pfiltergain=50
filtertype=peak
chokkakuautovol=0
chokkakuvol=50
ver=171
--
beat=4/4
0000|00|--
--
...
You can ignore most of this and press CTRL + F or whatever hotkey your find is and search for your comment.
--
//Mark here!
0001|00|--
0000|02|--
0010|00|--
0100|00|--
0000|20|--
1000|00|--
0001|00|--
0000|02|--
--
Heres what mine looks like. Under the comment, place lane_toggle=(value) replacing (value) with whatever number you want. Placing another one of these comments will make the lane reappear. The value is how long it takes to disappear or reappear. Lower means it will disappear quicker
--
//Mark here!
lane_toggle=50
0001|00|--
0000|02|--
0010|00|--
0100|00|--
0000|20|--
1000|00|--
0001|00|--
0000|02|--
--
This will not show up in the editor, but will be there when you test play. Your comment will mark where it is in the editor, but you can also remove the comment line if you like.
Illegal patterns and charting practices
Since you can do (mostly) anything in KSM, you can accidentally (or purposely) make patterns that are illegal or questionable. In general, anything that is using both lasers and buttons at the same time is illegal.
While you can do this, note that, in general, it’s a bad idea.
Sometime you can make a pattern that is too fast for your hands to get to the knobs comfortably. For example:
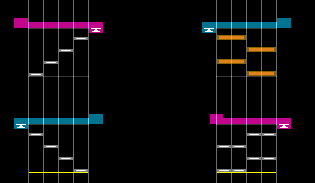
These are uncomfortable to play because the transition from the note to the laser is too fast. The rule of thumb is
Every 125 BPM, double the spacing required
So, for example: 0-125 = 16th minimum, 125-250BPM = 8th minimum.
This isn’t a hard set rule and just depends on the situation. The best way to know if you have a bad pattern is to play it if you can.